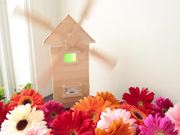
Lil’ Breezy
Windmills have been around for over 1000 years, converting wind into power. We created this mini 'mill to keep you cool and charged throughout the day. Make your own lil' Breezy to decorate your desk and help you chill throughout the warm summer.
STEP 1
Build your circuit: power + dimmer + wire + bargraph + wire + dc motor.
STEP 2
We used balsa wood to create our windmill, but you can use all sorts of different materials like cardstock or cardboard. To create the windmill structure's back and sides, cut three balsa wood blocks of the same size. Attach the wire and bargraph to the inside surface of the back panel of the house.
STEP 3
Cut some equal length pieces of balsa wood to build the front panel of the house. Make sure to cut out two squares near the top of your windmill; one for the D-shaft of the DC motor and one as a window for your bargraph to shine through.
STEP 4
Now, assemble the windmill. Glue the two sides and the back together. Cut a small shelf from the balsa wood for your DC motor to rest on. Make sure it fits snuggly between the two walls, and then glue it in to place. Attach the front of your windmill and build a roof for it.
STEP 5
Build the sails for your windmill and glue them together in the shape of an "X". To attach the sails to the DC motor we glued a piece of an eraser to the center of the sails and stuck the D-shaft of the motor into the eraser.
STEP 6
Attach the power and dimmer to the back panel of the house. Now you can turn on the power, adjust the dimmer, and control the great breeze your mini windmill generates!

